Getting Started
Warning
This documentation is a
pre-releaseversion and may be subject to change.
Welcome to the Getting Started Guide for the DataX Cluster.
After reading this page, you will understand:
- A brief introduction to the DataX cluster
- The currently supported storage services
- A how-to guide for using the services
1. DataX Cluster Overview
The DataX cluster is a dedicated storage cluster for the ScaleX POD at GIST.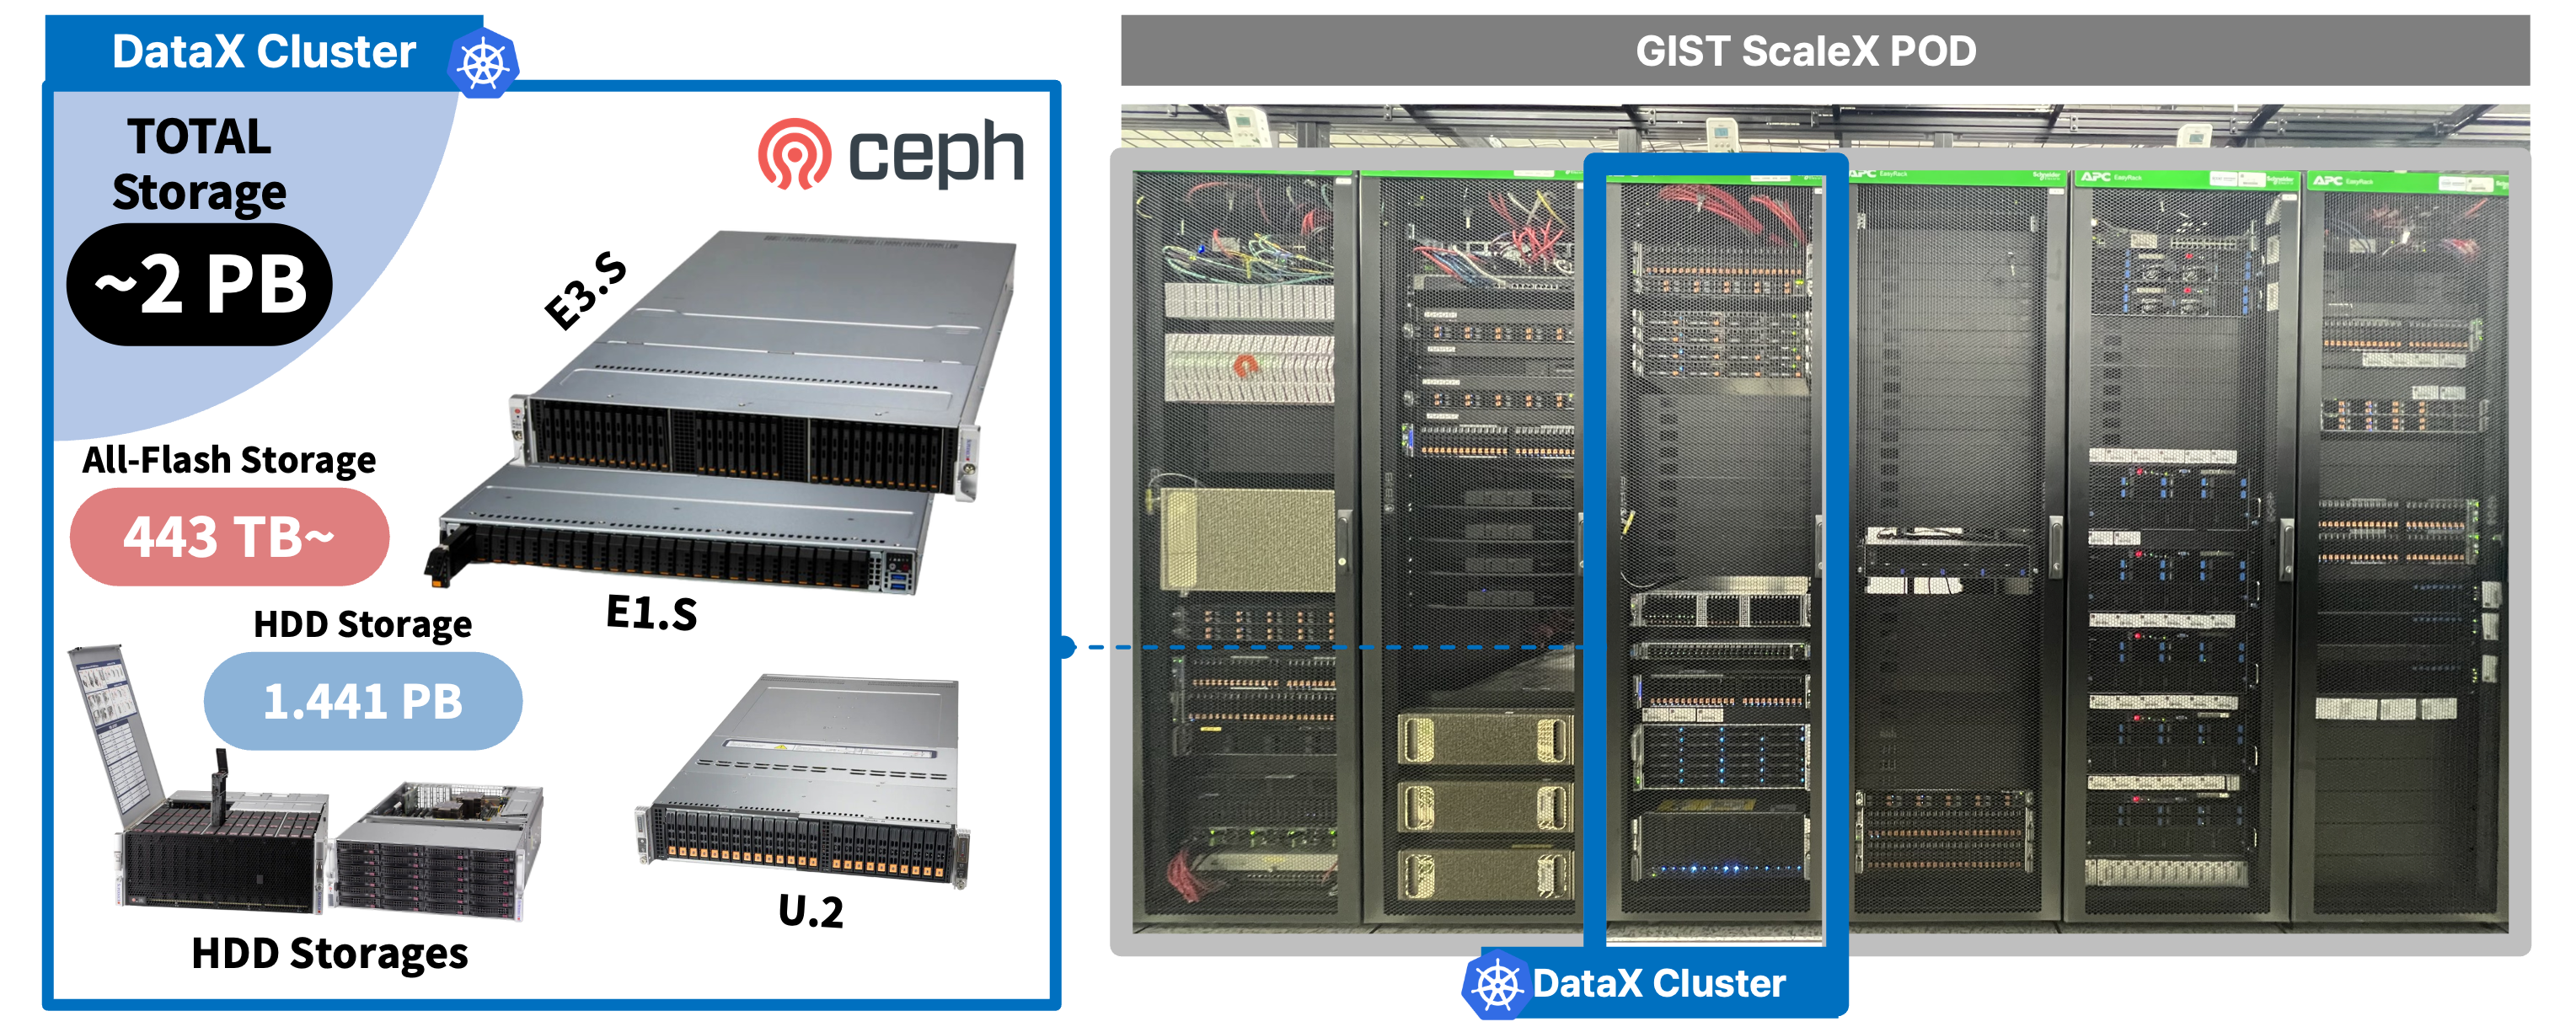
There are 4 distinct Ceph Clusters within the DataX environment:
- (2-nodes)
dx-rook-ceph-ssd-a: A top-performance SSD cluster equipped with sufficient CPU and Memory (E1.S / E3.S form factor). - (2-nodes)
dx-rook-ceph-ssd-b: A high-performance SSD cluster with an adequate level of CPU and Memory, combining research purposes (U.2 form factor). - (1-node)
dx-rook-ceph-hdd-a: A stable, large-capacity HDD cluster equipped with sufficient CPU and Memory. - (1-node)
dx-rook-ceph-hdd-b: A large-capacity HDD cluster for backups, configured with a somewhat limited CPU but an adequate amount of Memory.
Note
A Note on High Availability (HA)
According to Ceph’s documentation, the best practice is to build a cluster with a minimum of three nodes to ensure high availability and resilience.
However, each Ceph cluster in our DataX environment is intentionally configured with only one or two nodes. This non-standard setup was chosen because the DataX cluster is a versatile resource used for research on multi-tier storage systems. We acknowledge that this configuration sacrifices high availability, but this is a deliberate trade-off made to facilitate our specific research objectives.
If you are interested in more details about the DataX cluster, please check out the Specification page.
2. Supported Storage Services
The DataX cluster currently provides the following storage services:
- NFS v4.1/v4.2 via a Ganesha-NFS server.
- S3-Compatible Object Storage endpoints via the Rook-Ceph Rados Gateway (RGW).
Note
Current Service Status
As the cluster is in an early development stage, we are currently focused on providing NFS as a backend for Persistent Volumes (PVs) to other clusters within the ScaleX POD (TwinX, AutoX, MobileX). Access to the S3-compatible RGW is limited to the
hdd-acluster for specific use cases. For future development plans, please refer to our Roadmap page.
Warning
Disclaimer
The DataX cluster serves as a central storage repository for the ScaleX POD and is operated through the voluntary contributions of the NetAI Lab. As such, the development timelines for additional services may be subject to change.
3. How-to Use Guide
Among the available services, the recommended method for using the DataX cluster is by integrating it as an internal NFS service via StorageClass (SC) within the ScaleX POD clusters.
Note
About RGW service
As we described above, access to the S3-compatible RGW is currently limited to the
hdd-acluster for specific use cases. If you interested in RGW, please contact us directly. We can discuss about usage of it. For future development plans, please refer to our Roadmap page.

The primary role of the DataX cluster is to act as a “external storage (warehouse)” for other clusters in the ScaleX POD. It works through collaboration with the administrators of other clusters to provide Persistent Volumes (PVs), which can then be mounted as filesystems by pods.
Therefore, using the DataX cluster as a standalone service is not currently supported. We only support (and recommend) its use in the form of PVs mounted to pods in other clusters.
Note
A Note on Direct Access Tools (like MinIO)
We initially planned to offer a service using the MinIO client for direct, file-system-like access. However, recent changes in MinIO’s open-source policy, specifically the removal of essential management features (such as user and policy administration) from its web-based user interface, have made it difficult for us to provide a stable and user-friendly service.
This change requires all administrative tasks to be performed via the command-line interface (CLI), significantly increasing management complexity. Furthermore, this signals a shift towards a more aggressive commercial model, creating uncertainty about the future feature set and stability of the community version.
On the other hand, we have explored several open-source web-based file managers to act as a user-friendly front-end for our existing CephFS storage. Full-fledged platforms like Nextcloud offer a rich UI but are heavyweight and architecturally complex, creating substantial maintenance overhead for what should be a simple file access service. Conversely, lighter-weight tools like Filebrowser are simple to deploy but lack the robust multi-tenancy, granular permissions, and detailed auditing features required to operate a secure and scalable public service. At present, these alternatives present a trade-off between excessive complexity and insufficient enterprise-grade functionality.
Consequently, for now, we are focusing on the integrated NFS model.
This guide provides instructions for two different groups of users:
- End Users within the ScaleX POD (e.g., researchers, students).
- Administrators of other ScaleX POD clusters (e.g., TwinX, AutoX, MobileX).
3.1. Guide for End Users 👨🏻💻
If you are a user within the ScaleX POD and wish to use the DataX cluster’s resources as an external “warehouse” for your projects, you’ve come to the right place.
The process begins with a usage request. Here are the steps:
- Submit your application to DataX and ScaleX POD admin
- Equipment Utilization Agreement
- Example yaml to create pod with your DataX stoarge
Step 1: Submit your application to DataX and ScaleX POD admin
First, contact the cluster administrators with your storage requirements.
- DataX Cluster Admin:
datax@dreamai.kr - TwinX Cluster Admin: TBD
Please include the following information in your request, as it is essential for provisioning:
- Storage Tier: Which cluster you want to use (e.g.,
SSD-A,HDD-B). - Purpose: A brief description of the intended use (e.g., “Dataset for deep learning model”).
- Capacity: The amount of storage required (e.g., 10TB).
- (opt.)Desired Share Path: A suggested name for the share (e.g.,
/netai-sys). - (opt.)Permissions (UID/GID): The User ID and Group ID that should own the files (e.g., UID: 1001, GID: 1001).
Get a sample application form with .hwpx here.
Step 2: Equipment Utilization Agreement
The management and operation of persistent data using the DataX Cluster are run through the dedicated efforts of students from the NetAI Lab, who act as goodwill volunteer contributors.
Therefore, we ask that you please approach all interactions with a foundation of mutual warmth, consideration, and agreement.
However, despite these efforts, to clarify how we will handle potentially negative (or unavoidable) situations that may arise in the future, we require all users to complete the following Equipment Utilization Agreement.
A sample of this form is attached to the Step 1 materials for your review.
Step 3: Use the Storage
Here is an basic example yaml file to make your own pod with DataX cluster storage.
Warning
You can create pod with DataX after your ScaleX POD cluster admin already create StorageClass(SC) and PersistentVolumeClaim(PVC).
They will make your delicious storage as soon as possible.
Warning
Currently, NFS servers only support GID/UID-based authorization.
Therefore, these values must be treated confidentially.
You will get these from DataX cluster admin directly.
# pod-with-nfs-pv.yaml
apiVersion: v1
kind: Pod
metadata:
name: my-app-pod
spec:
securityContext:
runAsUser: 0000 # Match the UID from the request
runAsGroup: 0000 # Match the GID from the request
fsGroup: 0000 # You can get these IDs from admin later
containers:
- name: my-app
image: busybox
command:
volumeMounts:
- name: my-nfs-storage
mountPath: /data # Path inside the container
volumes:
- name: my-nfs-storage
persistentVolumeClaim:
claimName: nfs-pvc-test # Must match the PVC name
You can now use the provisioned PVC in your pod deployments within your cluster (e.g., TwinX) to access the storage.
3.2. Guide for Cluster Administrators 👨🏻🔧
This guide is for administrators of other clusters in the ScaleX POD who need to integrate DataX storage for their users.
Prerequisites
Before you begin, ensure that the end-user has completed the request process (Steps 1-2 above) and you have received the following from the DataX administrator:
- The Ganesha-NFS server’s internal IP address like
10.0.0.1. (put it intonfs-ipbelow) - The full export path for the user’s share. (put it into
/foobelow)
Step 1: Create a StorageClass
First, define a StorageClass that points to the DataX NFS provisioner. This allows users to request storage from DataX dynamically.
# sc-nfs-datax.yaml
apiVersion: storage.k8s.io/v1
kind: StorageClass
metadata:
name: nfs-ceph-sc-netai-ssd-a # Use a descriptive name for the storage tier and user
provisioner: nfs.csi.k8s.io
parameters:
server: # IP of the DataX Ganesha-NFS server
share: # The export root from the NFS server
reclaimPolicy: Retain
volumeBindingMode: Immediate
mountOptions:
- nfsvers=4.1
Apply the manifest to your cluster: kubectl apply -f sc-nfs-datax.yaml.
Step 2: Create a PersistentVolumeClaim (PVC)
Instruct your user to create a PersistentVolumeClaim that references the StorageClass you just created. This claim requests a specific amount of storage from the NFS backend.
# pvc-nfs-datax.yaml
apiVersion: v1
kind: PersistentVolumeClaim
metadata:
    name: nfs-pvc-test
spec:
    accessModes:
        - ReadWriteMany
    resources:
        requests:
            storage: 1Gi # The amount of storage requested by the user
    storageClassName: nfs-ceph-sc-netai-ssd-a # Must match the StorageClass name
Step 3: Mount the PVC in a Pod
Finally, if your cluster doesn’t make user to create their pod themselves with yaml, then you will need to connect a service of the end users to above pvc. So the users can mount this PVC into their pods to access the storage. The pod’s securityContext should be configured to match the UID/GID specified in the original request to ensure correct file permissions.
Warning
Currently, NFS servers only support GID/UID-based authorization.
Therefore, these values must be treated confidentially.
You will get these from DataX cluster admin directly.
This setup provides a seamless way for pods in your cluster to use the centralized, large-capacity storage offered by DataX.
# pod-with-nfs-pv.yaml
apiVersion: v1
kind: Pod
metadata:
name: my-app-pod
spec:
securityContext:
runAsUser: 0000 # Match the UID from the request
runAsGroup: 0000 # Match the GID from the request
fsGroup: 0000 # You can get these IDs from admin later
containers:
- name: my-app
image: busybox
command:
volumeMounts:
- name: my-nfs-storage
mountPath: /data # Path inside the container
volumes:
- name: my-nfs-storage
persistentVolumeClaim:
claimName: nfs-pvc-test # Must match the PVC name
Copy Code/search_index.en.json$MATCHES more matches